Disclaimer
All content provided on this blog is representation of the blog owner and not Franciscan University of Steubenville. The information on this site is purely used for education purpose. The owner of this blog makes no representations as to the accuracy or completeness of any information on this site or found by following any link on this site. The owner will not be liable for any errors or omissions in this information nor for the availability of this information. The owner will not be liable for any losses, injuries, or damages from the display or use of this information.
Privacy
The owner of this blog does not share personal information with third-parties nor does the owner store information is collected about your visit for use other than to analyze content performance through the use of cookies, which you can turn off at anytime by modifying your Internet browser’s settings. The owner is not responsible for the republishing of the content found on this blog on other Web sites or media without permission.
Blog Comments
The owner of this blog reserves the right to edit or delete any comments submitted to this blog without notice due to;
1. Comments deemed to be spam or questionable spam
2. Comments including profanity
3. Comments containing language or concepts that could be deemed offensive
4. Comments that attack a person individually
This policy is subject to change at anytime.

Friday, September 27, 2013

Preparing a Capsule Stain

After doing a negative stain we now are going to do a capsule stain. By doing a capsule stain we are able to see if our bacteria have capsules or slime layers.

We first prepared a smear of bacteria in the Nigrosin stain.


Then after the smear is completely dry we covered it with the Safranin stain for one minute as indicated in our lab book.


After one minute, we gently washed off the excess stain. We had to make sure to avoid removing much of the stain. 


We, then, blot water from the slide with bibulous paper.


We now can see whether or not our bacteria from sample S have capsules or not! 


As you can see under the oil immersion lens of a microscope our bacteria do not have capsules because there is no space between the bacteria itself and the surrounding stain.


Preparing a Negative Stain of Sample S!

In lab we did a negative stain of sample S so that we could view the bacteria cells that are difficult to stain with basic dyes and are easily distorted by heat-fixation. Therefore, we created a dark background for the bacteria cells

To create this negative stain we first placed a tiny drop of Nigrosin stain near one end of a clean slide.


Then we used a sterilized inoculating loop to transfer a small amount of bacteria, taken from our sample S, into the Nigrosin stain drop.

 
We then mixed the bacteria into Nigrosin stain drop.


We made sure to flame our loop before we set it down and we grabbed a second microscope slide and touched the Nigrosin stain drop at a 30-45 degree angle and quickly pushed the slide to spread out the drop.

Notice how the slide now has a thin film containing the Nigrosin stain and the bacteria from sample S.


We then waited for the slide to air dry completely and once it was done air drying we examined the stained smear under the microscope using the oil immersion lens.

Look at what we saw!!


(Fun note: It looks like stars in the night sky. The bacteria represent the stars and the purple background represents the night sky. It looks really cool!)

A Closer Look at Sample S!!

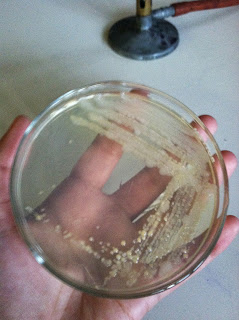
When we removed our stock bacteria of sample S from the incubator we found the bacteria had grown in the same pattern as our first slanted agar plate and looked the same, so we were able to successfully transfer the bacteria.
Next we wanted to examine the bacteria more closely so put it on a microscope slide. Using the inoculating loop we got a bead of bacteria from our working culture (not the stock culture) and mixed it on the slide with a small drop of distilled water.
We waited for the slide to dry and then passed our slide through the flame of the Bunsen burner three times to heat fix our smear to the slide.

After this we proceeded to do a gram stain on our slide. We cover the slide with crystal violet for 20 seconds, then rinsed it off.

Next we covered the smear with gram's iodine for one minute, then rinsed it off.

Holding the slide at a 45 degree angle we dropped EtOH on the slide until the color from the stains stopped running. Immediately after we rinsed the slide and then covered the slide with safranin for one minute, and rinsed off the excess stain after.

To completely dry the slide we blotted it with bibulous paper, and then it was ready to be observed under the microscope. We put oil on the slide so that we could view the bacteria using the oil immersion lens. The oil is necessary because it has a refractive index that is the same as glass. Light can bend in air, so with the oil there, less light is lost and one is able to see their specimen more clearly.
By using the oil immersion lens we were able to see our sample more clearly, and this is what we observed!


 We found that our culture S was gram negative and the shape was long skinny rods. If you look closely you can even see some in the midst of binary fission. (they are the ones that look like long chains because they are multiplying to be many short rods)

Obtaining a Second Pure Culture and Preparing a Gram Stain!

After we observed our first pure culture under the microscope, we realized it contained multiple different bacteria. So, Dr. Pathakamuri helped us obtain a new pure culture.
When we came back to class, we removed it from the incubator and were delighted to see a pure colony! This means that like bacteria will colonize together in little dots, which you can see in these pictures.
Our next step was to collect a bead of bacteria and put it on a microscope slide so we could observe the bacteria in greater detail.

Using the inoculating loop we grabbed a bead of the bacteria, after we sterilized the loop of course. On the microscope slide we gently mixed the bacteria with a small drop of de-ionized water. Then we waited for the slide to air dry. Once it was completely dry we heat fixed the culture to the slide. To do this we passed the slide quickly through the flame three times. Now it is ready to be Gram stained!

We placed our slide on a drying rack over the sink at our lab bench. First we covered our smear with Crystal Violet for 20 seconds, and then rinsed the slide with distilled water to remove excess stain. Next we covered the smear with Gram's Iodine for one minute, and proceeded to rinse it with water afterwards to remove excess solution. After we held the slide at a 45 degree angle while adding EtOH until the color stopped running. We rinsed the slide immediately afterwards to remove the decolorizing agent. And lastly we covered the smear with Safranin for one minute, and then rinsed it with distilled water to remove the access Safaranin. Then to dry the slide we blotted the slide with a piece of bibulous paper. 
Now our slide is ready to be viewed under a microscope using the oil immersion lens. 


 The bacteria that we viewed were all a consistent rod shape and were also all gram negative. This ensured that we finally obtained a pure culture from our original environmental sample.
We could deduce that our bacteria was gram negative because of the pink hue they all contain. If our bacteria was gram positive the coloring would have been purple. This happens because a gram positive cell has more peptidoglycan and is therefore more resistant to taking the stains in to its membrane.

Friday, September 20, 2013

Preparing a Gram Stain

Now that we have obtained a pure culture we are ready to prepare a gram stain so that we could see the shape, size and arrangement of the bacteria. Also, we could determine whether the bacteria are gram-negative or gram-positive.

First we take a sample from our pure culture and heat fix the sample onto a slide. Then we placed the slide on a dry rack over a sink at our lab bench. We then covered the smear with a Crystal violet stain and left it on the slide for 20 seconds.


Afterwards we rinsed off the crystal violet with distilled water.


We put the slide back on the dry rack and then covered the smear with Gram’s iodine for 1 minute.


We rinsed off the Gram’s iodine with distilled water. Then we held the slide at a 45-degree angle and added the decolorizing reagent (EtOH) drop by drop until the color stopped running.


We immediately rinsed off the decolorizing reagent and covered the smear with a Safranin stain for 1 minute.

After 1 minute we rinsed the slide with distilled water to remove the excess Safranin.


Once all the Safranin excess was gone we blot water from the slide with pieces of bibulous paper.


Now we are ready to examine the stained smear under the microscope using the oil immersion lens and look what we saw!


Looking closely at the slide we realized that we did not in fact obtain a pure culture. As you can see we have at least two different types of bacteria one that is gram-positive and seems to have spores and another that is gram-negative. Therefore, Dr. Pathakamuri helped us obtain a more pure culture and at the next lab we will gram stain the new sample.